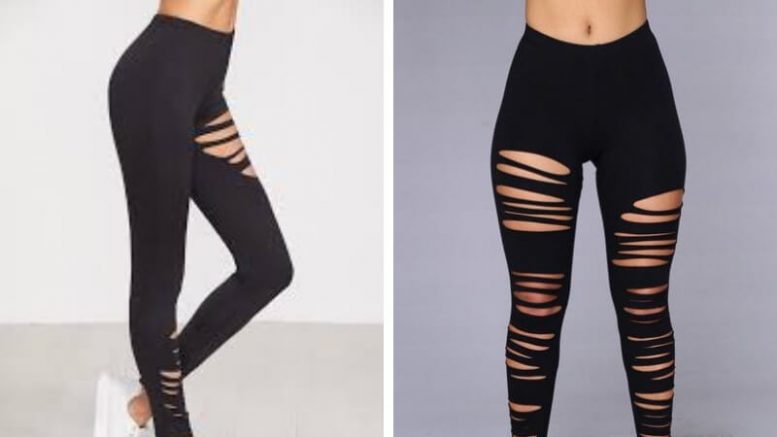
Making diy ripped leggings and jeans can seem difficult when companies are charging upwards of a hundred dollars per pair, but luckily, making ripped leggings at home is much easier than it seems. It only takes a few household items to be able to make your own, and it will save your wallet some money, too! In this article, we will show you how to make ripped leggings in just a few easy steps.
First you will want to pick out a pair of leggings that are on the thicker side. Do not pick a pair of leggings that has extremely thin material or they will fall apart as you cut into them and distress them. The fabric should be comfortably thick and not paper thin. The fabric should also be a little stiff, if you own leggings that are stiffer or choose to purchase any for the purpose of distressing them.
You will then get your tools ready, which will be:
- A pair of scissors (fabric scissors work best, but if you do not have them then kitchen scissors will work)
- A pair of tweezers
- A pen or marker
- A pair of salad tossers.
This list seems strange, but the results you will end up with will amaze you!
How to Make Ripped Leggings – Step by Step guide
Get your leggings and put them on. Use the marker or pen to mark the spots where you want the distressing, and draw a thin line indicating where you will be making your cuts. Make two lines, one on top of the other, in various spots. They should be about 2 inches away from one another, or more if you want heavy distressing.
PRO TIP:
On leggings, I would advise against making a lot of long and deep cuts, as this can make your leggings looser when you put them on. Make sure when you try the leggings on that where you choose to make the cuts is not too close to the edges of the fabric, to make sure the seams do not split on you as you are creating your diy ripped leggings.
1. We will be distressing the parts in between the two lines you have indicated. Make it look as natural as possible by making the lines uneven. They should be on top of one another; the top OR bottom line should be off a little bit, by about an inch to an inch and a half. I personally like when the bottom line is the one which is off by an inch or so.
2. Once you have made your lines, take the leggings off and use the scissors to make the cuts across where you have marked the lines. There should be at least a couple inches of fabric in between each line.
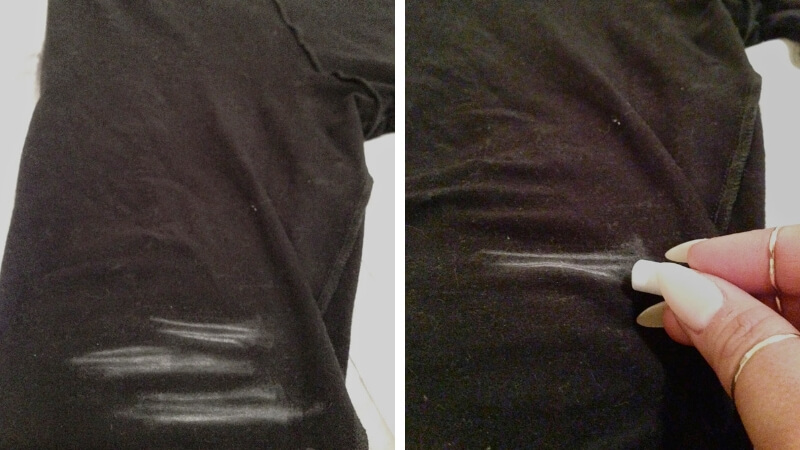
3. Then you will use the tweezers and pull the vertical strings out, one by one, leaving the horizontal ones alone. Start in the middle. This will take a long time, but the results are worth it!
4. You will want to set up a comfortable space to do this part in, and make sure your trash can is near you so you can dispose of the strands of fabric you are pulling out of the leggings. Try and be careful when doing this, as it is easy to overwork the fabric and there will only be holes where you made the cuts instead of the distressed lines. Be cautious when pulling each strand out.
Continue this process until you get to the edges of where you made the marks. At this point you should only be able to pull one side of the strand out while the other side is still stuck to the fabric. You will want to use your tweezers and be very careful, pulling the strand out while leaving one side connected.
Do this on all parts of of strands that are still partially connected to the leggings. They should be at an angle of about 45 degrees, making look as natural as possible.
Once you have completed the last step, cut the strands of fabric that are left so they are only about half of an inch long. They should be about half the length of the tip of your pinky. Get the metal salad tosser clamps and clamp them down on the edges of the fabric. Pull the fabric tosser across the edges and this will help it have a more “distressed” look.
Repeat this step as needed and do not forget to be cautious with this fabric, as it is fragile and can be overworked. If some of the strands are too long, cut them a little bit shorter and repeat the process. If you want or need more distressing, go back to the first step and make a few more slits and take out the strands in the middle, as previously mentioned.
Once you have completed distressing your leggings, they might look a little funky since they have not been washed yet. To make the fabric puffier and more natural looking, put the leggings in the washer and dryer and make sure they are fully dried before pulling them out. They should look like organically distressed leggings now!
How to DIY Ripped Leggings Conclusion
Now you have learned in whole how to make ripped leggings effectively and beautifully. This is a time-consuming process, but there is no better feeling than when you have a pair of leggings distressed for a cheap price! Normally, these leggings would run up to over fifty dollars at least, but this process saved you money, even though it may not have saved you time.
This process is ideal for someone wanting to have a new look but not for the price point it is sold retail at. It is easy to DIY anything, as long as you know the steps on how to do it.
Read also: How to wear leggings in the summer | How to wear carly with leggings
This same process can be done to jeans! If you have an old pair of jeans that needs re-vamping, use this guide to distress them and make them brand new again.
How to distress jeans
If you are distressing jeans, you will want to pull out the blue vertical strands in between the slits instead of the black fabric strands you will find in a pair of leggings. Make sure to leave the white horizontal strands, as they will give the distressed look to your pair of jeans.
By pulling out only the blue jean strands, you are leaving behind the horizontal white ones which are found on many pairs of distressed jeans. I suggest only doing the horizontal cuts for jeans on the thighs, as it looks more authentic. Vertical cuts will completely ruin the jeans and leggings and should be avoided at all costs.
You will want to go through the same process with the salad tossers and tweezers, making sure each strand is pulled out and the jeans are distressed. You will want to be more rough with jeans since the fabric can handle more wear-and-tear compared to the fabric of leggings.
The salad tossers should be metal for jeans, as they are going to be able to pull out more of the fabric leaving the ends looking messier and more frayed. For leggings, they can be plastic since they will not be as rough on the leggings compared to the metal salad tossers.
How to make ripped leggings and jeans tips and tricks
On jeans, you can distress the back pockets, too! This gives a cute look to any pair of jeans as long as you are cautious with the scissors and do not cut too much fabric so you can’t put anything in your pockets. It is also a cute look for your front coin pocket, as well, but it will take smaller scissors and smaller cuts, which will be about one inch long for both the top and bottom cuts.
You sill go through the same process of cutting horizontally and pulling out the vertical strands. The only difference is this is on a much smaller scale if you choose to distress the front or back pockets.
You can also do this to denim shorts, as well. The cuts will be much smaller, but you can distress jeans, leggings, and shorts all with this method. The shorts will need to have longer, thinner cuts, but much shorter vertically since there is less fabric to work with.
If you are looking to distress your bottoms for extra cheap, go to your local thrift store and try on a few different pairs of leggings, jeans, and shorts. This is where I get all of my diy clothes and I have done diy ripped leggings for other people as gifts, as well! It is great way to show someone you care all while giving them a new piece of clothing to wear for free.
Nothing feels better than getting to up-cycle old clothes and reuse them in new ways. By using this method, you will be able to distress all types of bottoms for dirt cheap. Distressing jeans seems really difficult, but in just a few easy steps and a few hours of free time, you can have the leggings, jeans, or shorts of your dreams.


